


Blame it on the Girls
Friday, May 21, 2010

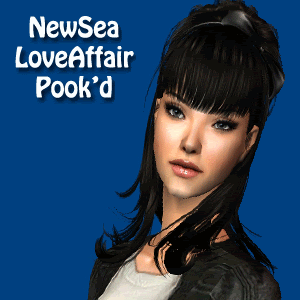
Seven Jeans with Marc Jacobs Bustier by TxPrincessShan
Vest by Shock-N-Shame
XM Sims Hair Pook'd by TXPS
Download
Default Replacement Poses for Bodyshop 2.0
Wednesday, April 21, 2010

Converted these poses Girls Posebox by May for use with the Bodyshop Mechanic.
Poses are for all ages.
New Poses for the Bodyshop Mechanic
Wednesday, April 14, 2010

Unzip them into your folder ...My Documents\EA Games\The Sims 2\Config\
Then you will find them on the list of poses next time you run BodyShop Mechanic.
Select the one you want to use on the drop-down list, and run BodyShop.
Thank you to Wes H. and Dr.Pixel
And eletrodj creator of the Cup of Poses
Angelina
Sunday, April 4, 2010

Tweaked Pooklet Hair Texture
Recoloured by TxPrincessShan
4 Natural Colors all binned
Download Hair+Mesh
Amelia
Monday, March 8, 2010
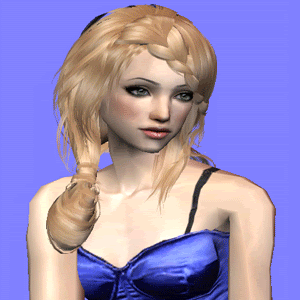
Tweaked Pooklet Hair Texture
Recoloured by TxPrincessShan
10 Natural Colors all binned

Cassandra
Tuesday, February 16, 2010

Mesh 6138 by Peggy
Texture by Pooklet
Model by Stefan
Recolored by TxPrincessShan
Download Hair and Mesh
Guide for Installing the Bodyshop Mechanic
Monday, January 25, 2010

First you need to download Dr. Pixels Bodyshop Mechanic at MTS2
Be sure that you have WINRAR installed. When you click download WinRar will ask if you want to OPEN or Save(covered in last tutorial)
Click OPEN

Click Extract
The Bodyshop mechanic must be placed in the Config folder in order for it to work. It is very easy to locate...instead of placing the item in Downloads(which is what you would normally do) The Config folder is located just above Downloads

Now that you have extracted the Mechanic you must install it.

Now that you have sucessfully installed the Mechanic you will need to install replacement lighting in order to get the most out of your new program.

Brightening up BodyShop for a Spring Cleaning by Wes Howe
When you click download WinRar will ask if you want to OPEN or Save(covered in last tutorial)
Click OPEN

The Lights must be placed with the bodyshop mechanic in the Config folder in order for it to work

Now you can run the Mechanic
Click the dropdown box to adjust the lighting. I prefer the whXB lights since it seems to create a more natural look but test it out and find one that you like. Each time you make an adjustment in the Mechanic you must close the Bodyshop and reopen it in order for your change to appear.
Labels:
Tutorial

Alfie
Sunday, January 24, 2010
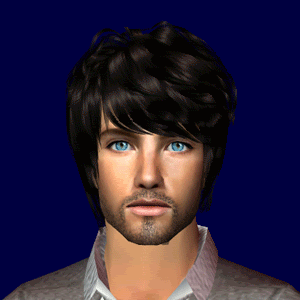
Pooklet Project Mayhem Texture
Recoloured and binned by TxPrincessShan
Download Hair and Mesh
Decode
Sunday, January 3, 2010

Eyes by Enayla
Make up by Bruno
Skintone and Nosemask by Sironasims.com
Earrings by Anna Maria Sims
Eyelashes by Mintclover
Hair Mesh by Peggy
Recoloured Hair by Mikexx2
Dress Mesh by Liana
Original Outfit by TxPrincessShan
Song dedicated to fgc101411
Sim requested by Avatarstar
Waking Up

Sim Requested by Inari94
Eyes by Majalene Enjoli Sims
Hair recolour by Meike
Hair Mesh by shadylady482
RabidAngel Mesh Recoloured by TxPrincessShan
Sweater by Liana
Download Waking Up
Labels:
Downloads
How to Download Custom Content
Saturday, January 2, 2010
Before we begin you must have Winrar in order to extract the files.


Click Download and when you a box like this will appear. I prefer to save it to my downloads folder and continue downloading instead of extracting my files all at once.

As you can see here the file will be saved to C:\Users\"Your name"\Downloads. This is not the Sims folder that contains downloads so if you stop now your items that you just downloaded will not appear.


Magically the items appear as package files that are recognized by your game
 Now the files can be moved to My Documents\EA Games\The Sims 2\Downloads where they can be enjoyed by your sims!
Read more »

First step is to go to a site and find your item(s) I am at LianaSims.
I have never gotten a virus or had any problems with the items from Liana but just be wary of some of the other places since some custom content can crash your game.

Click Download and when you a box like this will appear. I prefer to save it to my downloads folder and continue downloading instead of extracting my files all at once.

As you can see here the file will be saved to C:\Users\"Your name"\Downloads. This is not the Sims folder that contains downloads so if you stop now your items that you just downloaded will not appear.

Now go to your downloads folder and select all (ctrl+a) the items that you would like to extract then right click on the items and click extract here

Magically the items appear as package files that are recognized by your game

Labels:
Tutorial
Ziggy Stardust


Makeup by Bruno
Eyes by Enayla
Skintone by SironaSims.com
Star Earrings from AnnaMariaSims2
Hair by XM Sims
Clothing Mesh is from Glamourous Lounge
Outfit is from the 2009 Resort collection of Alexander McQueen made for Sims by TxPrincessShan
Download Ziggy Stardust Sim
Download Ziggy Stardust Sim

Labels:
Downloads
BodyShop Tips and Tricks


*if you have the BodyShop Mechanic you can add background images and change the color


To create a picture of your computer screen for editing all you have to do is press the prt sc button on your keyboard (for laptops you press fn+prt sc) and then press ctrl+v in you paint program...Voila now you can edit your simmies picture

Labels:
Tutorial
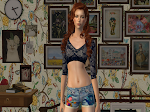
Tangled Up in Blue

False Eyelashes by Mintclover
Eye color by Enayla
Nosemask and Skintone at Sironasims.com
Clothing Created by TxPrincessShan
Download Sim Tangled up in Blue
Labels:
Downloads
The Chill of an Early Fall

Makeup by BarcelonistaMakeup by BrunoFalse Eyelashes by MintcloverEye color by EnaylaNosemask and Skintone at Sironasims.comHair created by Peggyzone.comClothing Created by TxPrincessShan
Labels:
Downloads
Welcome!
Welcome to my Blog!

TheSims2.com - MySims
"I use the bodyshop mechanic to change both the lighting and poses of my sims.
When Downloading these tools be sure to unzip in the My Documents\EA Games\The Sims 2\Config\ folder instead of downloads.
1. Download bodyshop mechanic here-
http://www.modthesims.info/download.php?t=231443
2. Download lighting-
http://www.modthesims.info/download.php?t=231443
3. Download Replacement poses-
http://www.modthesims.info/download.php?t=231441
___________________________________
I simply use the prt screen and paste into photoshop to edit the backgrounds. I find high resolution pics for the backgrounds since those seem to turn out the best. I prefer photoshop since it allows me to use layers and not just one flat pic. If you have any more questions feel free to ask. :)
Hope that I helped.
___________________________________
Also I used this tutorial by Simfishwick to change my default upload picture:
http://thesims2.ea.com/exchange/story_detail.php?asset_id=147822&asset_type=story&user_id=2291395
___________________________________
Special Thanks to Dr. Pixel, Wes Howe, and Simfishwick for their wonderful contribution to the Sims"
Labels:
Random Thoughts,
Tutorial
Subscribe to:
Posts (Atom)


